Monday, September 29, 2008

Second color layer on the "Wedding Paintings"

I've finished the second color layers on my new paintings. Remember each color is held in place by a coat of gloss polymer medium. 
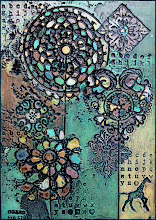
You might like to compare these with the previous post which shows the paintings with only the first color layer. I've kept the paintings in the same order on both posts. Now I must add a third layer of color to these paintings - the moment of truth!

Friday, September 26, 2008

First color layer on new "wedding paintings"

Now - fun with color! When the colors work somewhere near my expectations, then that's my kind of fun. Should I get a life?
Each of these paintings will get two more coatings of color - two more color layers. The next colors will be darker than the color already used. The painting below will be a challenge because it is quite dark already.
In my photography club, someone mentioned that vertical images are more dynamic than horizontal ones?

Monday, September 22, 2008

That special moment called beginning!

I finished building my new work table a few days ago. Then I had no excuse for not beginning the six primed "wedding painting" pieces of masonite. Part of the work table was made from the library fund-rasing sign.
The first step is to scoop the joint compound onto the masonite.
Next, I use a plaster tool to smooth a thin coating of plaster over the surface of the masonite. I strive for a layer that is 1/16" to 1/8" thick. I used to tell people that it is like frosting a cake, but I really have no idea if that's true!
I try to leave some "natural" texture from the action of the smoothing tool. Above, I have started adding textures with doilies and rulers. Below, I have finished with letters, stamps and a few other things.
Now I must wait for about 48 to 72 hours so that the plaster is hardened and dry. I will sand the surface to smooth any sharp edges. Next I will paint two coatings of gloss polymer medium to make the plaster waterproof. That is necessary because I use watered acrylic paints to make my color layers.

Some new alphabets

Here are some "little ditties" about the alphabet. I'm still learning what works best for this motif.
I feel that my textures are just an excuse to make colors without having to painting a picture.

Friday, September 19, 2008

Juvenile Diabetes - Walk for a Cure!

I read somewhere that about one child in six hundred develop juvenile diabetes. If you are ever asked to contribute to one of the many, many walkathons across our nation, please consider doing so. Click on this link to see some of the highlights of the Johnsonburg, PA's 2008 Walk for a Cure.

Saturday, September 13, 2008

A new wedding painting

Here is the plaster with two coatings of gloss polymer medium.
Below the first color layer was done with yellow oxide and cadmium yellow. It is easy to see where I have removed the yellow.
The second color layer is an orange with some cadmium red. Again it is quite easy to see where I have removed some of the orange.
The third color layer has been done with a mixture of pthalo green and burnt umber. Lots of erasing was necessary to get back to the yellows and oranges.
Finally, I have added green washes in a few areas and some gold highlights in the doily textures.

I have painted a coating of polymer medium after each color layer.

Thursday, September 11, 2008

Early experience with textures

During my years in college at Mansfield University, I liked to work with clay because of the opportunities to add texture to my artwork. Below are three pieces done on the potter's wheel with textures added.
The bowl above was just given back to me by my friend Marie Henninger who had a silk flower arrangement in it for about thirty years. (It reached the end of its shelf life!)
I used iron oxide (rust) for some of the coloring. I rubbed it on, then off. Much would be left in the textures. (Very similar to the painting steps I use to color my textured paintings.)
When I began developing my textured paintings, I viewed them as a poor man's substitute for clay.

Wednesday, September 10, 2008

M.U. faculty ART exhibit

The faculty of the ART Department at Mansfield University delivered the goods for the first show of the 2008-09 school year. Below you'll see Bob who is the advisor to the Art Committee that sets up the various art exhibits during the year in the North Hall Library.
Below Ruth Anne who is a weaver is smiling because there was a large and energetic crowd.
The striking pieces below were crafted by Bob.
Mardi, the professor who gave me the job of supervising ART student teachers, did the following pieces in porcelain.
A favorite place - the snack table!
Daryl put together the fun sculpture below.
Below some students look over my work.
I'm sorry that I didn't get photographs of everything! Maybe you can go to campus to see the show first hand!

Tuesday, September 9, 2008

Who let the dogs out!

Here are two links to short YouTube videos. The first one shows Corey and his Grampa doing "pool diving" and the second video introduces Guinness playing soccer with Corey.

ABC - Jim Gurney's Art By Committee

I'm struggling to get back in "drawing" shape. I'm trying to work larger again (like I did back in the 70s). The prompt for this week's ABC is "she was stiff and clumsy with rage. White blonde hair spilled ..." At least I got the clumsy. Go to Gurney Journey to see how others solved this prompt.
I've mentioned to myself to make a drawing area in my cellar "studio" so that might happen soon - hopefully that will help!